API Keys: Choose What Each Key Can Do

Samuel Su
on November 13, 2026An API key is like a password that lets another program — for example, a connection someone set up between your online shop and Chat Data — use your Chat Data account. In this post, "your tool" means the app or website that uses the key (for example, your online shop), and "your helper" means the person who connected it (say, your web designer). (The chat bubble on your website does not use an API key.) Until now, every key could do everything your account can do, forever. Now you can give each key only what it needs, so a key that ends up in the wrong hands can do far less harm.
🙋 Does This Affect Me?
If you don't use API keys, nothing changes and there's nothing to do. Keys you already have keep working exactly as before until you change them yourself.
Not sure whether you have any keys?
- Open Workspace settings in the left menu and choose API keys.
- Open each chatbot, go to its Settings, and choose API Keys — keys made for one chatbot appear only there.
- If every list is empty, you don't use any.
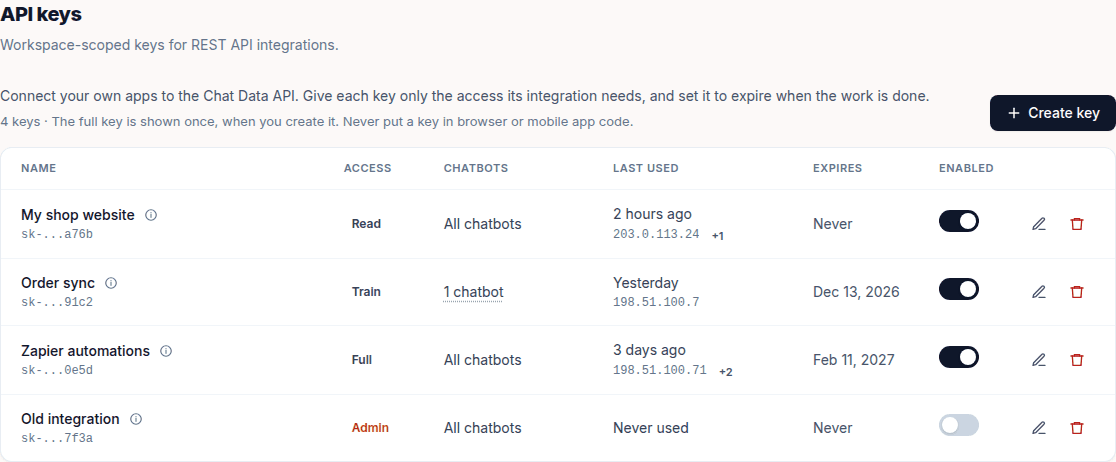
If you find a key you don't recognize, ask your helper before changing it. If you can't ask, turn it off with the on/off switch in that key's row, under Enabled, rather than deleting it — you can turn it back on if something stops working.
🔑 What You Can Now Choose for Each Key
- Access level — what the key may do. Each level can do everything the ones above it in this list can, plus more:
- Read — look at chatbots, conversations, customer contact details and stats, and chat with your chatbots
- Train — plus add or remove your chatbot's Sources (the documents and web pages it learns from)
- Full (not the top level) — plus create chatbots and change their settings, answer customers in live chat, and send WhatsApp messages
- Admin — the top level: plus delete chatbots and conversations. Keys you had before this update are set to Admin. You don't have to change them — to make them safer, ask your helper which level it really needs.
- Chatbot access — a key made in Workspace settings can work with all your chatbots or only the ones you tick. A key made on one chatbot's page works with that chatbot only.
- Expire after — 1 day, 7 days, 30 days, 90 days, 1 year, or Never, counted from when you create or save the key. After that, the key stops working.
- On/off switch (the Enabled switch) — pause a key and turn it back on later, unchanged.
New keys start at Read. Pick the lowest level the tool needs — if you're not sure, ask your helper. Even Read can see your customers' conversations and contact details, so only give keys to people and tools you trust.
⚡ How to Set It Up
- Go to API keys — in Workspace settings for a key that works with several chatbots, or in one chatbot's Settings for a key just for that chatbot. If you're not sure which, ask your helper.
- Click Create key (on a chatbot's page it's called Create New Key), or the ✏️ pencil next to a key you already have. A panel opens on the right.
- Give the key a name you'll recognize later (such as "My shop website"), then choose Expire after, Chatbot access and Access level.
- Click Create key or Save changes.
- If you made a new key, Chat Data shows the whole key only this once — click Copy key right away, then paste it where your tool asks for it, or send it to your helper, and no one else. (Changing a key's settings doesn't change the key itself, so there's nothing new to copy.)
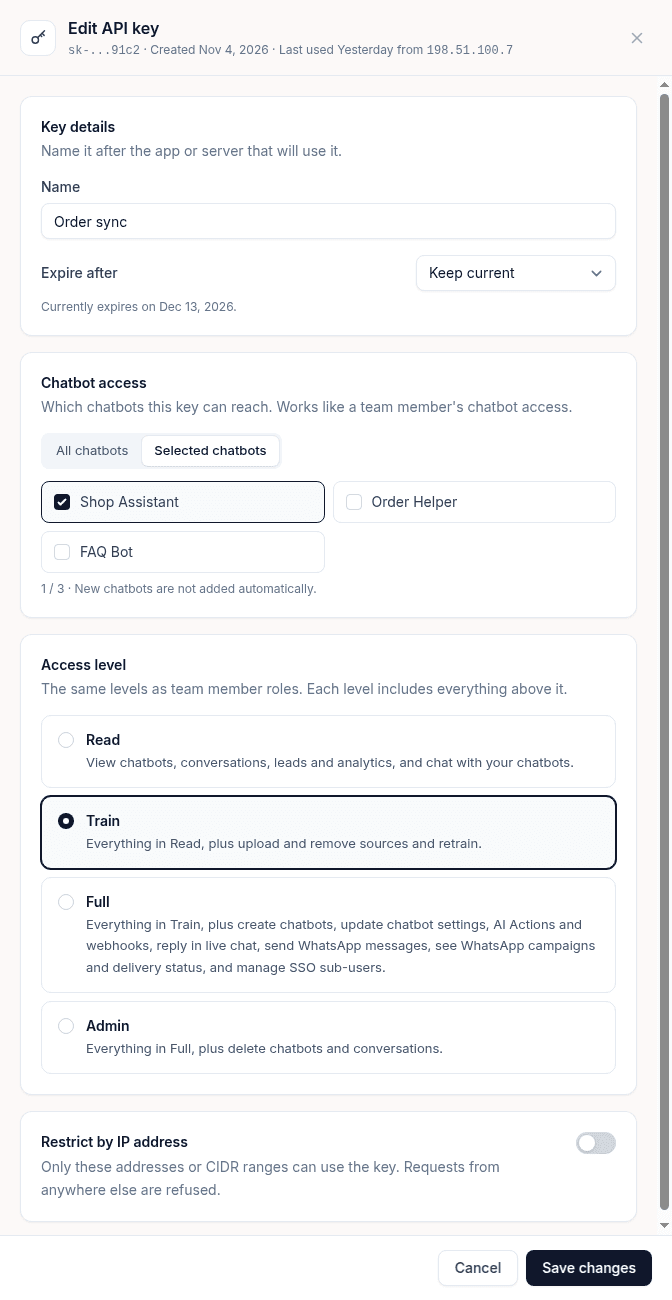
If you no longer have a copy of a key, make a new one, give it to the tool, and only then delete the old one with the 🗑️ trash icon. If you think someone else has your key, turn it off right away with its Enabled switch — your tool will stop working until you make a new key and your helper puts it in.
If a tool suddenly stops working, first check that its key's Enabled switch is on. Then look at the Expires column. If it says Expired, click the ✏️ pencil, choose a new Expire after (counted from today), and click Save changes — the same key works again.
🛠️ For Your Helper
The rest of this post is for your helper. You can stop reading here.
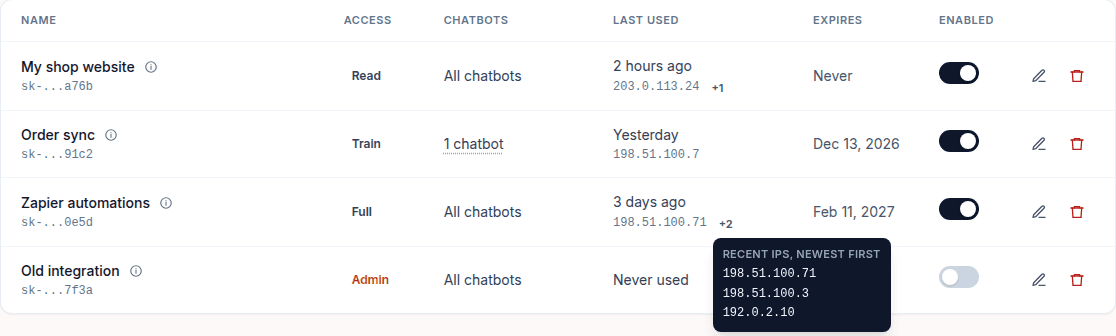
- Recent IP addresses — the API keys page shows when each key was last used and the IP address of the computer that used it; hover over or tap the small "+2" (or similar) to see up to the last 5, newest first. Refused requests aren't listed.
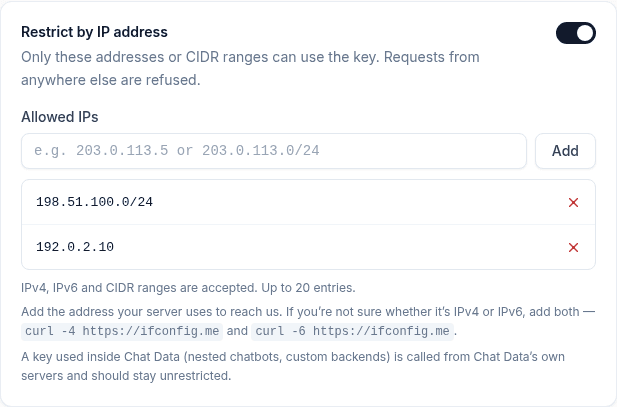
- Restrict by IP address — list up to 20 IP addresses or ranges (in the key's panel, switch on Restrict by IP address, type an address, click Add, then Save changes). Requests from anywhere else are refused without saying why. Use the address of the server that actually calls the API, not a home connection, whose address can change. Keep keys that Chat Data itself uses — for example one chatbot calling another — unrestricted, because those requests come from Chat Data's own servers.
- Who can manage keys — workspace members whose role is Owner or Admin (with access to all chatbots) manage workspace keys; members with Full or Admin permission on a chatbot manage that chatbot's keys. No one can give a key a higher level than their own.
- API Reference — every operation in our API Reference now lists the access level it needs.